How to Install a Curved Deck Floor
If you are building a deck, you might see some architectural challenges. A correct-angled deck is one matter, challenging plenty to become right, but a curved deck adds quite a bit to the challenge. In this example, a redwood deck is being built up next to some existing curved physical steps. This requires that the wood be curved to match. In this tutorial, we'll show you step by step the most efficient and effective method nosotros establish for DIYing a curved wooden deck. We hope you lot discover it useful also.
Note: The author is an experienced, although not professional, architect. Utilize the advice set forth in this tutorial at your ain risk. E'er bank check edifice codes in your area before building. Neither the author nor Homedit is responsible for damages equally a result of following this tutorial.
 View in gallery
  View in gallery
 Before you brainstorm installing your curved deck floor, you lot need to brand certain you have your wall-mounted deck frame and deck floor joists in place first. Notation: We recommend starting with the outer curved floor board get-go, before laying any other deck flooring, for a couple of reasons. First, y'all want enough space at the top of your curved board that yous can mount it effectively, rather than having it taper off into a tiny point. Second, looks can be deceiving, and information technology can be hard to eyeball what is perpendicular when yous're looking at a curve. Aligning and laying this first curved board volition improve the parallel nature of the entire deck floor.
 View in gallery
 To this end, run a precisely perpendicular chalk line from your house or the edge of your deck to the other border of your deck. This chalk line should be perpendicular to your deck flooring joists. As the starting off point of your entire deck floor, this line will be critical in keeping the redwood deck floor boards parallel.
 View in gallery
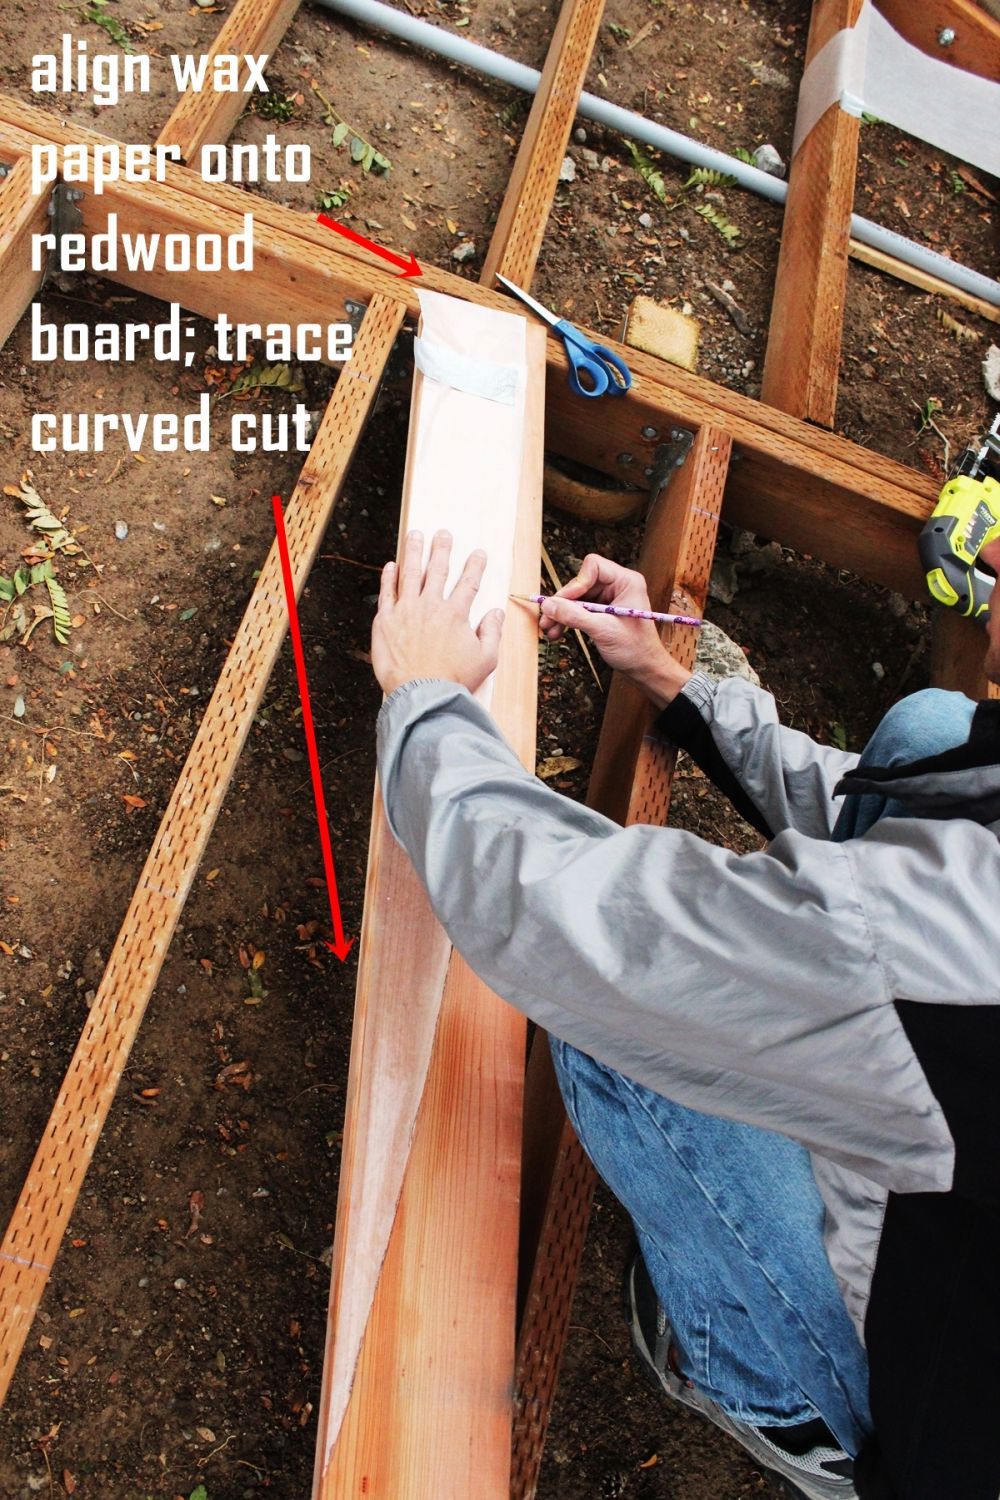
 Rip off several feet of wax newspaper. Equally in, the wax newspaper people use in baking. Align the edge of the wax paper with the chalk line (it should be out near 5" or 6" from the acme of the curve) and tape into place so the wax paper runs directly.
 View in gallery
 Continue the wax newspaper as flat and taut as possible, but don't pull information technology tight. The taping won't stick too well, and you'll find yourself pulling the wax paper right off wherever information technology is y'all just taped it. Only don't worry; if yous're careful, this record job will exist good enough for our temporary purposes.
 View in gallery
 Utilise a dark permanent marker to lightly trace the edge of the bend. Keep the line precisely spaced along your concrete; so, if you start your line at the point of the physical where it begins to bend down toward the ground, maintain that point all the fashion downwards your line. In this example, we drew the line about 1/4″ away from the concrete edge that nosotros could see, but we maintained that same altitude all the way downward the curved line.
 View in gallery
 Advisedly cut your wax paper along the line you just drew.
 View in gallery
 If necessary, and before y'all remove your wax paper, brand sure the top of the paper is precisely aligned with the edge of your deck (in this case, the house wall). We had to record a couple inches of wax paper onto the superlative to marshal it precisely. This is so you can align the wax paper onto your board exactly forth the elevation terminate of your board.
 View in gallery
 Record or carefully hold the wax paper onto your lath, aligning the top and direct side. Information technology's important hither to consider the amount of your board that you're leaving intact. We recommend you leave at the very least i" thickness of lath all the style to the top; a fiddling more is meliorate, if you can. It's a balancing act, though, because you also want to have care of as much of this very long curved edge equally possible with ane lath.
 View in gallery
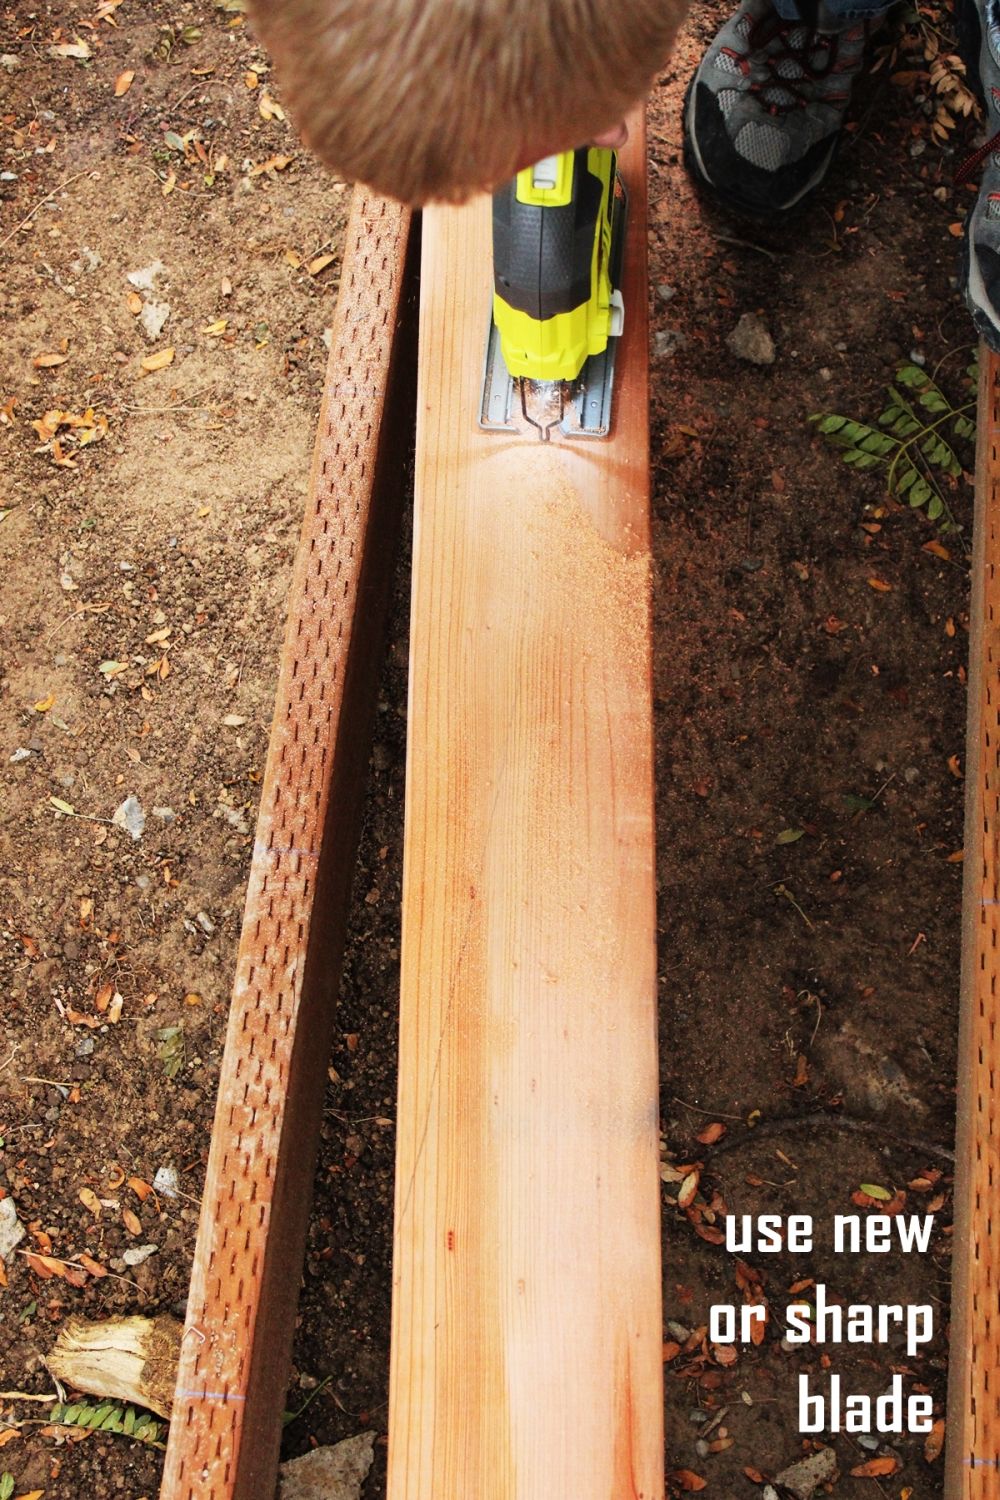
 Install a new blade into your jigsaw, or at to the lowest degree make sure yours is very sharp. While it may not be complete precision cut, you don't want the jigsaw to chew up your curved edge if you tin can help it. And a sharp bract will assistance you with this.
 View in gallery
 Use a jigsaw to carefully cut along your curve.
 View in gallery
 Yous may miss parts of the bend line initially; get back and get them once again so that your curve is smoothen and fits as precisely as y'all can manage.
 View in gallery
 A jigsaw has a tendency to wobble a bit as you get. Just remember that if your curved line happens to have some bumps, your bodily curved concrete step (or any) is likely very smooth. So, while you desire to make sure you cut forth the curved line, also exist aware that the line's small imperfections can exist smoothed out with a smooth jigsaw cutting.
 View in gallery
 Dry fit the board to your curve. Brand any adjustments needed. For case, if your gap between the board and the concrete is as well bang-up, consider cut an inch or two off the top of your board to bring the whole thing in closer without sacrificing your curved cut. You can ever sand out slightly wavy sections, if needed.
 View in gallery
 When the board fits perfectly in the curve, get ahead and lightly sand off the crude corner. Don't get carried away here, though; you don't want to modify the curve.
 View in gallery
 Lay the board down, this time exactly where you want it. We recommend leaving a slight gap between concrete and wood for drainage purposes.
 View in gallery
 Remember your chalk line? Align the curved-cut lath perfectly with the chalk line. Make sure the curve still works at all parts of physical connectedness.
 View in gallery
 We're going to be using Camo make deck screws (ii-iii/viii" for 2×half dozen redwood deck floor boards), because we'll be using Camo deck spacers to install these curved pieces.
 View in gallery
 With the chalk line alignment precise, it's time to install the curved border of your redwood board.
 View in gallery
 With a helper holding the board firmly in identify, predrill (we recommend a seven/xvi" bit) at a rather sharp downward angle the parts of the curved lath that lie over joists.
 View in gallery
 So install the Camo screws into the predrilled points.
 View in gallery
 Adjacent, y'all'll want to throw a couple of screws onto the concrete side of the board. Don't get carried away here, though; y'all don't need these every few inches. Predrill and spiral into the point of the lath that separates (bend-wise) from the physical, into the wall-mounted deck frame. Then do the same at the top finish of the board. Depending on the length of the curve, you might want to install some other one in the middle of the curve (if it's several feet long), but you don't necessarily demand to even exercise that, because the lath at that signal is then narrow, and yous've already attached it to the joist on the apartment side of the board.
 View in gallery
 With the curved part of your lath installed, information technology'southward time to plow our attending to the lesser (flat) portion of the board.
 View in gallery
 Work your style, joist by joist, down the length of your lath toward the edge. Check for alignment with your chalk line EACH Time y'all attach the board to a joist. As your kickoff deck floor board, this one has to exist perfectly parallel and aligned. It can't exist overstated, how of import this is, to the effect of your deck overall.
 View in gallery
 On each joist, attach your Camo deck spacer by pulling the lever, sliding the guides over the edges of your lath until the spacer is affluent with the lath, and releasing the lever to clamp it in identify. Then install the screws.
 View in gallery
 The beauty of this tool is that the screws go in at an angle, slightly below the top of your board, so information technology is a very secure attachment while beingness practically invisible at the same time. Win-win.
 View in gallery
 So, allow's take a closer wait at the Camo deck spacer. Install it with the lever so it is direct over and parallel with the joist lath.
 View in gallery
 Install the screw all the mode down until the Camo drill bit stopper touches the deck spacer; in other words, until it tin't screw in whatever more.
 View in gallery
 Then, without moving the deck spacer, practise the same thing through the spiral hole on the other side of the deck spacer.
 View in gallery
 Remember that on the outer deck frame, where you doubled up your pressure treated lumber boards, y'all'll desire to adhere the deck board to both framing boards, on both sides.
 View in gallery
 Moving inward and down along your bend, you lot'll use this verbal same wax paper/sharpie method for every board. Be certain to mark, cut, and install each board individually before moving onto the next one.
 View in gallery
 When installing the subsequent boards along the curved physical, nosotros institute this to be helpful: At the inner nearly possible joist, place the Camo deck spacer for spacing between the boards themselves. Then, pound in a wooden shim to maintain spacing between the concrete and your board while you lot predrill. Always be sure, when y'all are predrilling, that you're doing so over a joist or a frame board. (Otherwise, what'south the point?)
 View in gallery
 Keeping the shim and deck spacer in identify, predrill all the points yous'll need.
 View in gallery
 In this example, due to the placement of the joists and frame, iii holes were predrilled for the terminate of this detail curved lath.
 View in gallery
 Install the screws with the deck spacer and shim in identify for every bit long as possible. If you lot find you accept to move the deck spacer in order to go a screw in, simply install the others commencement, then remove the deck spacer before installing the last screw.
 View in gallery
 Remember as y'all are predrilling and installing screws that the angle of the Camo deck spacer screw holes is adequately sharp. Endeavor to mimic this bending in your predrilling along the curve as best as you can, because that is what volition requite the screws the best security.
 View in gallery
 We recommend using two or 3 people to install each board – one on each side of the deck spacer to spiral in the screws, and one to ensure the board is securely parallel and spaced evenly and precisely before screw installation fifty-fifty happens.
 View in gallery
 Leave the boards to overhang the frame at this point; we'll cut them all evenly at the very end of your deck floor installation.
 View in gallery
 Piece by piece, you lot'll get your curved deck installed. It looks beautiful when you're washed.
 View in gallery
 Even if it rains right after installation, y'all tin can still appreciate the beauty of a curved redwood deck, right? It's not piece of cake, and some curves are probably going to give you fits, but it's absolutely worth information technology in the end.
Source: https://www.homedit.com/install-a-curved-deck-floor/
Postar um comentário for "How to Install a Curved Deck Floor"